Thursday, August 27, 2015

Craft- How to Make an "Eat Me" Cookie and "Drink Me" Bottle!

Hello! I recently did an Alice in Wonderland photoshoot (that you will see soon!), and I made some props. Today I will show you how I made an "eat me" cookie and a "drink me" bottle!

For the cookie you will need:
-Blue foam
-Tan foam
-Something round like a bottle cap that is the size you want your cookie to be
-Teal marker
-Red or maroon marker
-Scissors
-Hot glue/hot glue gun
-A photo for reference

1) Trace your round object or press it into the tan foam (that will leave an imprint).

2) Repeat with the blue foam.

3) Glue them together, the blue on the top.

4) Now write "EAT ME" on the cookie with the red or maroon marker.

5) Use the teal marker to dot sprinkles on the outside.

And you're done with the cookie!

Here's the cookie from the 1951 movie next to mine. You could do a wavy edge on yours, but I decided not to.

For the bottle you will need:
-Pink paper
-A hole punch
-Scissors
-A tiny bottle (mine held nail glitter, but I filled it with puff paint a while back)
-String or twine
-The same red or maroon marker
-Tape
-A photo for reference

1) Cut a little rectangle out of the pink paper.

2) Punch a hole on one side of the rectangle.
3) Write "DRINK ME" with the marker.

4) Attach a piece of string or twine to the top of the bottle by tying it or gluing it. String the other side through the hole in the paper and tie it or tape it down on the back like I did. (The writing is my first failed attempt xD)

And the bottle is done!

Here's the comparison.


I hope you enjoyed this tutorial! I will share the Alice in Wonderland shoot soon. :)

Until next time!
-Claire

Thursday, August 20, 2015

Caroline Reinette


Hey! Here are some photos of Caroline. I also renamed her middle name from Noel to Reinette. 
On another note, this is the first photoshoot I edited with Lightroom!
Until next time,
Claire

Thursday, August 6, 2015

Tutorial- Tasha Lem Inspired Look

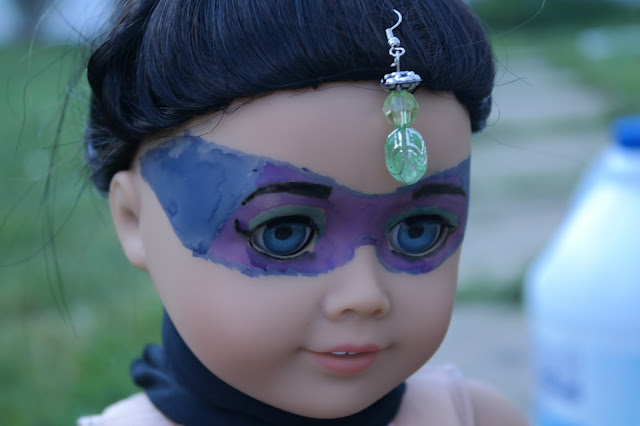
Hello! Today I'm going to show you how I did makeup on Evelyn inspired by Tasha Lem, who is in the Doctor Who episode, "The Time of the Doctor". I did this for another Doctor Who photoshoot coming up, and it was fairly easy to do.

This picture was my inspiration.

You will need:
*WASHABLE markers in the colors black, blue, teal, and purple.
*Hair tie and bobby pins
*A dangly earring

First I did her hair. I put it in a high bun, leaving some out. I put a braid in the leftover hair and wrapped it around the bun. Because Evelyn has layered hair, little bits kind of stuck out, but she is the closest match to Tasha.

For the first basic steps of the makeup, I took my black marker and gave her eyeliner and drew over her eyebrows. Remember to only use a washable marker, or it will be permanent!

Then I  gave her teal eyeshadow. 
Next, I made an outline with the blue marker where I would fill the rest in. It's kind of hard to explain, but I just started with the blue near her hair and gradually switched to purple. It's easy if you are looking at a photo.

Lastly, I hooked an earring into her hair to be the dangly thing.

I also wrapped a piece of black fabric (it's actually black leggings! xD) around her neck to be a "collar", and there you go!


So why am I doing another Doctor Who photoshoot? Well, season 8 comes on Netflix Saturday, and my last one was really fun. We're going on a little trip this weekend, so I'll post it when I get back!
Should I do more of these cosplay/makeup looks?
~Claire
Related Posts Plugin for WordPress, Blogger...